Fundamentals#
Pipeline#
To use vpype, you compose “pipelines” of “commands”. In a given pipeline, geometries are passed from command to command, starting with the first all the way to the last.

Pipelines are created by passing vpype the first command name together with its options and arguments, then the next command name, and so on.:
$ vpype command1 [--option X [...]] [ARG [...]] command2 [--option X [...]] [ARG [...]] ...
The list of every command is available by running the help option on the core vpype command:
$ vpype --help
Usage: vpype [OPTIONS] COMMAND1 [ARGS]... [COMMAND2 [ARGS]...]...

Options:
  -v, --verbose
  -I, --include PATH  Load commands from a command file.
  -H, --history       Record this command in a `vpype_history.txt` in the
                      current directory.
  -s, --seed INTEGER  Specify the RNG seed.
  --help              Show this message and exit.
    ...
Help on each command is also available by running the help option on that command, for example:
$ vpype circle --help
Usage: vpype circle [OPTIONS] X Y R

  Generate lines approximating a circle.

  The circle is centered on (X, Y) and has a radius of R.

Options:
  -q, --quantization LENGTH  Maximum length of segments approximating the
                             circle.
  -l, --layer LAYER          Target layer or 'new'.
  --help                     Show this message and exit.
Lines and layers#

The geometries passed from command to command are organised as a collection of layers, each containing a collection of paths.
The primary purpose of layers in vpype is to create or process files for multicolored plots, where each layer contains geometries to be drawn with a specific pen or color. In vpype, layers are identified by a non-zero, positive integer (e.g. 1, 2,…). You can have as many layers as you want, memory permitting.
Each layer consists of an ordered collection of paths. In vpype, paths are so-called “polylines”, meaning lines made of one or more straight segments. Each path is therefore described by a sequence of 2D points. Internally, these points are stored as complex numbers (this is invisible to the user but relevant to plugin writers).
Curved paths are not supported per se. Instead, curves are converted into linear segments that are small enough to approximate curvature in a way that is invisible in the final plot. For example, the read command transforms all curved SVG elements (such as circles or bezier paths) into paths made of segments, using a maximum segment size that can be set by the user (so-called “quantization”). This design choice makes vpype very flexible and easy to develop, with no practical impact on final plot quality, but is the primary reason why vpype is not fit to be (and is not meant as) a general-purpose vector graphics processing tool.
Note
One downside of using polylines to approximate curved element is a potential increase in output file size. For example, three numbers are sufficient to describe a circle, but 10 to 100 segments may be needed to approximate it sufficiently well for plotting. When this becomes an issue, tuning the quantization parameters with the -q option or using the linesimplify command can help.
Command taxonomy#
Commands come in four different types: generators, layer processors, global processors, and block processors. The first three are covered in this section. The block processors are different in the sense they act on the flow of execution of the pipeline. They are covered in the Blocks section below.

Generators#
Generators add new geometries to a target layer, preserving any content already existing in the layer. The content of the other layers is not affected. They accept a --layer TARGET option to control which layer should receive the new geometries. By default, the target layer of the previous generator command is used, or layer 1 for the first generator of the pipeline. Here’s an example:
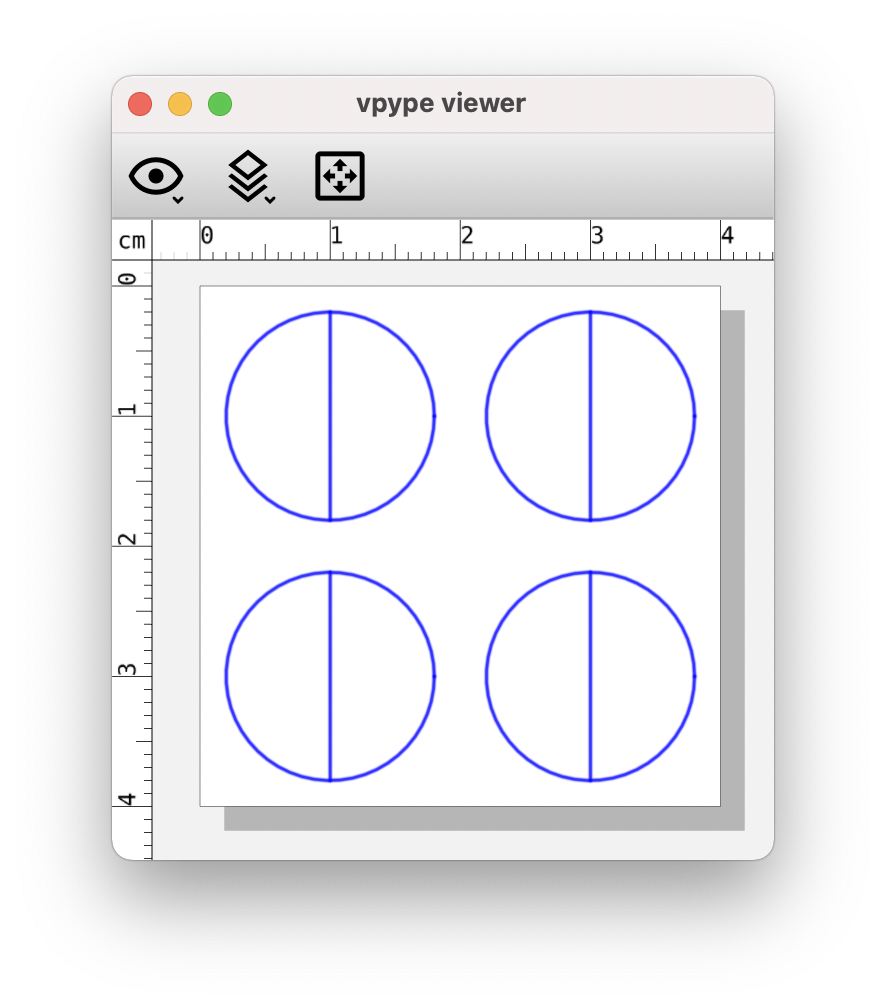
$ vpype line --layer 3 0 0 1cm 1cm circle 0.5cm 0.5cm 0.3cm
This pipeline will first draw a line on layer 3 from the point (0,0) to the point at (1cm, 1cm), then it will draw a circle also on layer 3 centred on the point (0.5cm, 0.5cm), with a radius of 0.3cm.
For generators, --layer new can be used to generate geometries in a new, empty layer with the lowest possible number identifier.
The following commands are further examples of generators:
Layer processors#
Layer processor operate on a layer-by-layer basis, modifying, complementing, or otherwise processing their content. The way a layer processor changes one layer’s content has no bearing on how it will affect another layer. For example, the linemerge command looks for paths whose ends are close to one another (according to some tolerance) and merges them to avoid unnecessary pen-up/pen-down operations by the plotter. It does this within strictly within each layer and will not merge paths from different layers.
Like generators, layer processors accept a --layer option, but, in this case, multiple layers may be specified. Also, if the --layer option is omitted, they default to processing all existing layers. Here are some examples:
$ vpype [...] crop --layer 1 0 0 10cm 10cm      # crop layer 1 only
$ vpype [...] crop --layer 1,2,4 0 0 10cm 10cm  # crop layers 1, 2 and 4
$ vpype [...] crop --layer all 0 0 10cm 10cm    # crop all layers
$ vpype [...] crop 0 0 10cm 10cm                # crop all layers
All these commands crop the specified layers to a 10cm x 10cm rectangle with a top-left corner at (0,0). Note that if you provide a list of layers, they must be comma separated without any whitespace.
Here are a few more examples of layer processors:
translate: apply a translation to the geometries (i.e. move them)
linesort: sort paths within the layer in such a way that the distance travelled by the plotter in pen-up position is minimized
linesimplify: reduce the number of points in paths while ensuring a specified precision, in order to minimize output file size
Global processors#
Unlike layer processors, which are executed once for each target layer, global processors are executed once only, and apply to all layers.
For examples, the write command uses all layers in the pipeline to generate a multi-layer SVG file. Likewise, the layout command considers all layers when laying out geometries on a given page format. Finally, the layer operations commands, such as lmove or lcopy, have effects on multiple layers at once.
Units#
Like the SVG format, the default unit used by vpype is the CSS pixel, which is defined as 1/96th of an inch. For example, the following command will generate a 1-inch-radius circle centered on coordinates (0, 0):
$ vpype circle 0 0 96
Because the pixel is not the best unit to use with physical media, most commands understand other CSS units including in, ft, mm, cm, m, pt and pc. The 1-inch-radius circle can therefore also be generated like this:
$ vpype circle 0 0 1in
Note that there must be no whitespace between the number and the unit, otherwise they would be considered as different command-line arguments.
Internally, units other than CSS pixels are converted as soon as possible and pixels are used everywhere in the code (see LengthType).
Likewise, angles are interpreted as degrees by default but alternative units may be specified, including deg, rad, grad and turn. The following examples all rotate a rectangle by 45 degrees:
$ vpype rect 0 0 50 100 rotate 45
$ vpype rect 0 0 50 100 rotate 50grad
$ vpype rect 0 0 50 100 rotate 0.125turn
$ vpype rect 0 0 50 100 rotate 0.785398rad
Properties#
In addition to geometries, the vpype pipeline carries metadata, i.e. data that provides information about geometries. This metadata takes the form of properties that are either global to the pipeline, or attached to a given layer. Properties are identified by a name, their value can be of arbitrary type (e.g. integer, floating point, color, etc.) and there can be any number of them.
How properties are created, modified, or deleted is up to the commands used in the pipeline. For example, the read command creates properties based on the input SVG’s contents and the write command considers some properties when writing the output file.
System properties#
Although there is in general no constraint on the number, name, and type of properties, some do have a special meaning for vpype. They are referred to as system properties and their name is prefixed with vp_. Currently, the following system properties are defined:
vp_color(vpype.Color): the color of a layer (layer property)
vp_pen_width(float): the pen width of a layer (layer property)
vp_name(str): the name of a layer (layer property)
vp_page_size(two-tupleoffloat): the page size (global property)
vp_source(pathlib.Path): the input file from which the geometries are created (global and/or layer property)
vp_sources(setofpathlib.Path): list of all input files from which geometries are created (global property)
Many commands act on these properties. For example, the read command sets these properties according to the imported SVG file’s content. The color, alpha, penwidth, name, and pens commands can set these properties to arbitrary values. In particular, the pens commands can apply a predefined set of values on multiple layers at once, for example to apply a CMYK color scheme (see Creating a custom pen configuration for more information). The page size global property is set by the pagesize and layout commands, and used by the write command.
Note
The vp_source and vp_sources properties are somewhat different from the other properties. They exist as a standard way for file-based commands and plug-ins to record the source file(s) from which geometries originate.
The vp_source property contains the last input file used, and may be overwritten if subsequent file-based commands are used. For example, the read command stores the input SVG path in vp_source as layer property if the --layer option is used, or as global property otherwise. If multiple read commands are used, the last one may overwrite the value from the earlier ones.
To address this limitation, the read command also appends the input SVG path to the vp_sources global property. The vp_sources property therefore is a set of all source files involved. Third-party developers are strongly encouraged to implement a similar behavior in their file-based plug-ins.
SVG attributes properties#
In addition to setting system properties, the read command identifies SVG attributes common to all geometries in a given layer and store their value as layer property with a svg_ prefix. For example, if all geometries in a given layer share a stroke-dasharray="3 1" SVG attribute (either because it is set at the level of the group element, or because it is set in every single geometry elements), a property named svg_stroke-dasharray with a value of "3 1" is added to the layer.
These properties are set for informational and extension purposes, and are mostly ignored by built-in commands. The notable exception is the write command, which can optionally restore these attributes in the exported SVG file.
An example of future extension could be a plug-in which detects the svg_stroke-dasharray property and turns the corresponding layer’s lines into their dashed equivalent. Another example would be a plug-in looking for a svg_fill property and adding the corresponding hatching patterns to reproduce the filled area.
Interacting with properties#
High-level commands such as penwidth are not the only means of interacting with properties. vpype includes a set of low-level commands to inspect and modify global and layer properties:
Property substitution#
Most arguments and options passed to commands via the vpype CLI apply property substitution on the user input. For example, this command will draw the name of the layer:
$ vpype [...] text --layer 1 "{vp_name} layer" [...]
The curly braces mark a property substitution pattern which should be substituted by the content of the property they refer to. In this case, if layer 1 is named “red”, the text “red layer” is drawn by the text command. Note the use of double quotes. They are needed because curly braces are typically used by shell interpreters such as bash or zsh. In this case, they are also needed to escape the whitespace between {vp_name} and layer.
To avoid substitution, curly braces can be escaped by doubling them:
$ vpype [...] text --layer 1 "{{hello}}" [...] # the text '{hello}' will be drawn
Numeric arguments and options also support substitutions (though they may result in an error if the substituted text is not a number). For example, the following command fills the entire page with random lines:
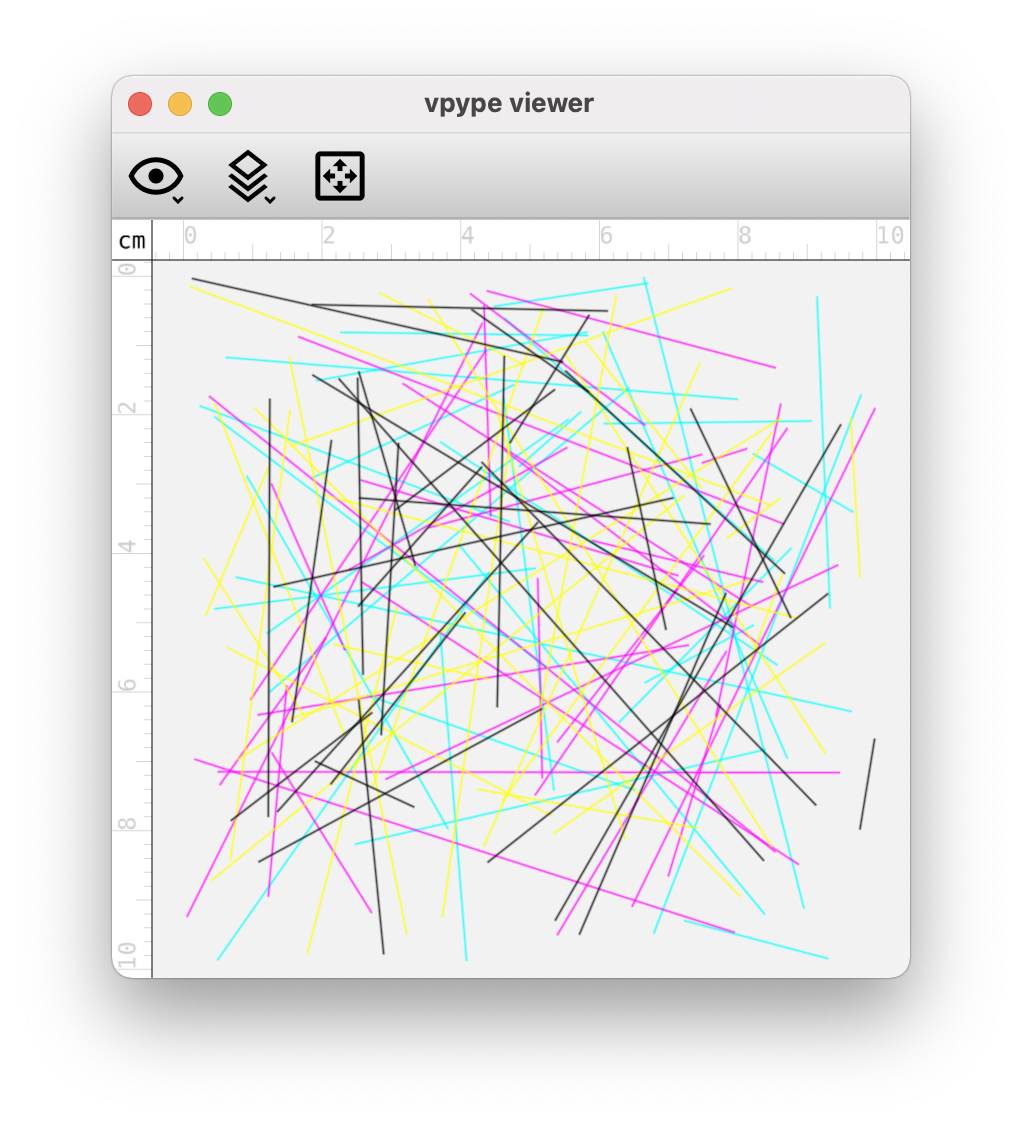
$ vpype pagesize a4 random -n 200 -a "{vp_page_size[0]}" "{vp_page_size[1]}" show
Internally, the substitution is performed using the str.format() Python function, which supports a number of customisation options for numerical values. Here are some examples to illustrate the possibilities:
{vp_pen_width}          -> 2.5
{vp_pen_width:.3f}      -> 2.500
{vp_pen_width:06.2f}    -> 002.50
{vp_page_size}          -> (793.7007874015749, 1122.5196850393702)
{vp_page_size[0]:.2f}   -> 793.70
{vp_color}              -> #ff0000
{vp_color.red}          -> 255
{vp_color.red:#02x}     -> 0xff
See the Python documentation for a complete description of the formatting mini-language.
Expression substitution#
Overview#
Most arguments and options passed via the CLI may contain so-called “expressions”, which are Python-like bits of code which vpype evaluates and replaces by what they evaluate to. Expressions are marked by enclosing percent characters (%).
Let us consider the following simple example:
$ vpype text %3+4% show
The argument passed to the text command, namely %3+4%, is enclosed with percent character and thus evaluated as an expression. The expression, namely 3+4, evaluates to 7, and thus the number 7 is drawn and displayed by the show command.
Expressions do not need to span the entirety of an argument. They can be mixed with regular text, and multiple expressions may be used in a single argument:
$ vpype read input.svg layout %3+4%x%7+2%cm write output.svg
There are two distinct expressions here (%3+4% and %7+2%). Considering the text around them, they collectively evaluate to 7x9cm, which happens to be a valid input for the layout command.
Most shells (e.g. bash, zsh, etc.) will interpret characters found in all but the simplest expressions. For example, the multiplication operator * is interpreted as a wildcard by the shell. Parentheses, brackets, and curly braces all have meanings to the shell too. As a result, arguments and options containing expression must often be escaped with quotes, for example:
$ vpype text "%round(4**3.2)%" show
(Here, the function round() converts its argument to the nearest integer, and ** is the exponentiation operator. This expression thus evaluates to 84.)
The eval command is often useful when using expressions. It does nothing but evaluate the expression it is passed. For example, this pipeline draws and displays the text “hello world”:
$ vpype eval "%txt='hello world'%" text %txt% show
Since eval has no other purpose than evaluating an expression, the expression markers % may be omitted. This is a valid variant of the same pipeline:
$ vpype eval "txt='hello world'" text %txt% show
Finally, the expression marker % may be escaped by doubling it. The following example draws and displays a single percent character:
$ vpype text %% show
Basic syntax#
The syntax of expressions is a sub-set of Python, and is interpreted by the asteval library. Its documentation states:
While the primary goal is evaluation of mathematical expressions, many features and constructs of the Python language are supported by default. These features include array slicing and subscripting, if-then-else conditionals, while loops, for loops, try-except blocks, list comprehension, and user-defined functions. All objects in the asteval interpreter are truly Python objects, and all of the basic built-in data structures (strings, dictionaries, tuple, lists, sets, numpy arrays) are supported, including the built-in methods for these objects.
There is no shortage of online material covering the basics of Python syntax, which we will not repeat here. The context in which expressions are used in vpype is however unusual. This leads to some peculiarities which are discussed in the next few sections.
Scope and variables#
Multiple expressions may be scattered across several commands in a single vpype pipeline. They are all evaluated in the same scope. This means that a variable created in one expression is available to subsequent expressions. This is often used in combination with the eval command to set or compute values which are used multiple times in the pipeline. For example:
$ vpype \
    read input.svg \
    eval "m=2*cm; w,h=prop.vp_page_size; w-=2*m;h-=2*m" \
    crop "%m%" "%m%" "%w%" "%h%" \
    rect "%m%" "%m%" "%w%" "%h%" \
    write output.svg
Here, the expression used with the eval command creates a variable m to store the margin size, unpacks the page size property (vp_page_size) into two variables (w and h), amd corrects them for the margin. These variables are then used multiple times to crop the geometries and draw a rectangular frame with the given margin. Note that cm and prop are built-in symbols, as explained in the next section.
Built-in symbols#
This section lists and describes the symbols (functions and variables) which are built-in to vpype expressions.
The following standard Python symbols available:
Most the Python built-in classes and functions:
abs(),all(),any(),bin(),bool,bytearray,bytes,chr(),complex,dict,dir(),divmod(),enumerate(),filter(),float,format(),frozenset,hash(),hex(),id(),input(),int,isinstance(),len(),list,map(),max(),min(),oct(),ord(),pow(),range,repr(),reversed(),round(),set,slice,sorted(),str,sum(),tuple,type,zip()Functions and constants from the
mathmodule:acos(),acosh(),asin(),asinh(),atan(),atan2(),atanh(),ceil(),copysign(),cos(),cosh(),degrees(),e(),exp(),fabs(),factorial(),floor(),fmod(),frexp(),fsum(),hypot(),isinf(),isnan(),ldexp(),log(),log10(),log1p(),modf(),pi(),pow(),radians(),sin(),sinh(),sqrt(),tan(),tanh(),trunc()Some of the function from the
os.pathmodule:abspath(),basename(),dirname(),exists(),expanduser(),isfile(),isdir(),splitext()
In addition, the following vpype-specific symbols are available:
The
prop,lprop, andgpropproperty-access objects.These special objects provide access to the global or current-layer properties. Properties may be accessed by attribute (e.g.
%prop.vp_name%) or indexation (e.g.%prop['vp_name']%). Thegpropobject provides access to global properties. Thelpropobject provides access to the current layer’s properties if available (i.e. within generator and layer processor commands). Thepropobject looks first for current-layer properties, if any, and then for global properties.Units constants (
px,in,ft,mm,cm,m,pc,pt).These variables may be used to convert values to CSS pixels unit, which vpype uses internally. For example, the expression
%(3+4)*cm%evaluates to the pixel equivalent of 7 centimeters (e.g. ~264.6 pixels). (Note that expressions may overwrite these variables, e.g. to use themvariable for another purpose.)The
glob(pattern)function.This function creates a list of paths (of type pathlib.Path) by expending the provided pattern. In addition to the usual wildcards (
*and**), this function also expends the home directory (~) and environment variables ($varor${var}), similarly to what shells typically do. See Using paths for more info on using paths in expressions.The
convert_length(),convert_angle(), andconvert_page_size()functions.These functions convert string representations of lengths, angles, respectively page sizes to numerical values. For example,
%convert_length('4in')%evaluates to the pixel equivalent of 4 inches, and%convert_page_size('a4')%evaluates to the tuple(793.70..., 1122.52...), which corresponds to the A4 format in pixels.The
Colorclass.This class can be used to create color structure from various input such as CSS-compatible strings or individual component (e.g.
Color("red"),Color("#ff0000), andColor(255, 0, 0)are equivalent). AColorinstance evaluates to a string that is compatible with the color command.
In addition to the above, block processors define additional variables for expressions used in nested commands. These variables are prefixed by a underscore character _ to distinguish them from symbols that are always available. See Block processor commands for a list.
Using paths#
Some properties (such a vp_source, see System properties) and expression variables (such as _path, set by the forfile block processor) are instances of pathlib.Path from the Python standard library. When evaluated, these objects behave like a string containing the file path and can be directly used with, e.g., the read command. The following command borrowed from the Merge multiple SVGs into a multilayer file recipe illustrates this:
$ vpype \
    forfile "*.svg" \
      read --layer %_i+1% %_path% \
    end \
    write output.svg
Here, the _path variable set by the forfile block processor is directly used as file path argument for the read command.
There is however much more that instances of pathlib.Path are capable of. The Python documentation covers this extensively, but here is a summary for convenience:
path.nameis the full name of the file.
path.stemis the base name of the file, excluding any file extension.
path.suffixis the file extension of the file.
path.parentis anotherpathlib.Pathinstance corresponding to the directory containing the file.
path.with_stem(s)is anotherpathlib.Pathinstance with the stem (i.e. file name excluding extension) replaced bys.Path objects can be composited with the
/operator. For example,path.parent / "dir" / "file.svg"is apathlib.Pathinstance pointing at a file named “file.svg” in a directory “dir” next to the original file.
The Wrapping a vpype pipeline in a shell script recipe provides a real-world example relying on pathlib.Path capabilities.
Single-line hints#
The Python syntax is known for its heavy reliance on line break and indentation (contrary to, e.g., C-derived languages). For vpype expressions, this is a disadvantage, as expressions must fit a single line. This section provides a few hints on how useful tasks may be achieved using single-line expressions.
Statement separator#
A single line of Python may contain multiple statements if they are separated with a semicolon (;). For example, this can be used to declare multiple variables in a single eval command:
$ vpype eval "a=3; b='hello'" [...]
The expression evaluates to the last statement. For example, this pipeline draws and displays the number 4:
$ vpype eval "a=2" text "%a+=2;a%" show
Conditional expressions#
In most cases, conditional expressions (also called “ternary operator”) are a good replacement for conditional block:
$ vpype eval %b=True% text "%'I win' if b else 'I lose'%" show
This technique is used by the Laying out multiple SVGs on a grid recipe.
Single-line conditionals and loops#
Although conditional and loop statements typically require line breaks and indentation, they can, in their simpler form, be used on a single line. For examples, these are syntactically valid and can be used as vpype expression:
if cond: n += 1
while cond: n += 1
for i in range(4): n += i
It is important to note that, formally, these are Python statement (as opposed to expression). They thus evaluate to None regardless of the actual run-time branching behavior. For example, this draws and displays “None”:
$ vpype text "%if True: 'hello'%" show
These constructs are instead typically used to assign variables which are used in subsequent expressions.
Another limitation is that single-line conditionals and loops cannot be juxtaposed with other statements using the statement separator (see Statement separator). In particular, a=3; if True: b=4 is invalid and if False: a=3; b=4 is valid but b=4 is part of the if-clause and is thus never executed in this case.
Despite their limitations, these constructs can still be useful in real-world situations. For example, the Load multiple files, merging their layers by name recipe makes use of them.
Blocks#
Overview#
Blocks refer to a portion of the pipeline which starts with a begin (optional) command followed by a block processor command, and ends with an end command. The commands in between the block processor and the matching end are called nested commands or, collectively, the nested pipeline. The block processor command “executes” the nested pipeline one or more times and combines the results in one way or the other. How exactly depends on the exact block processor command.
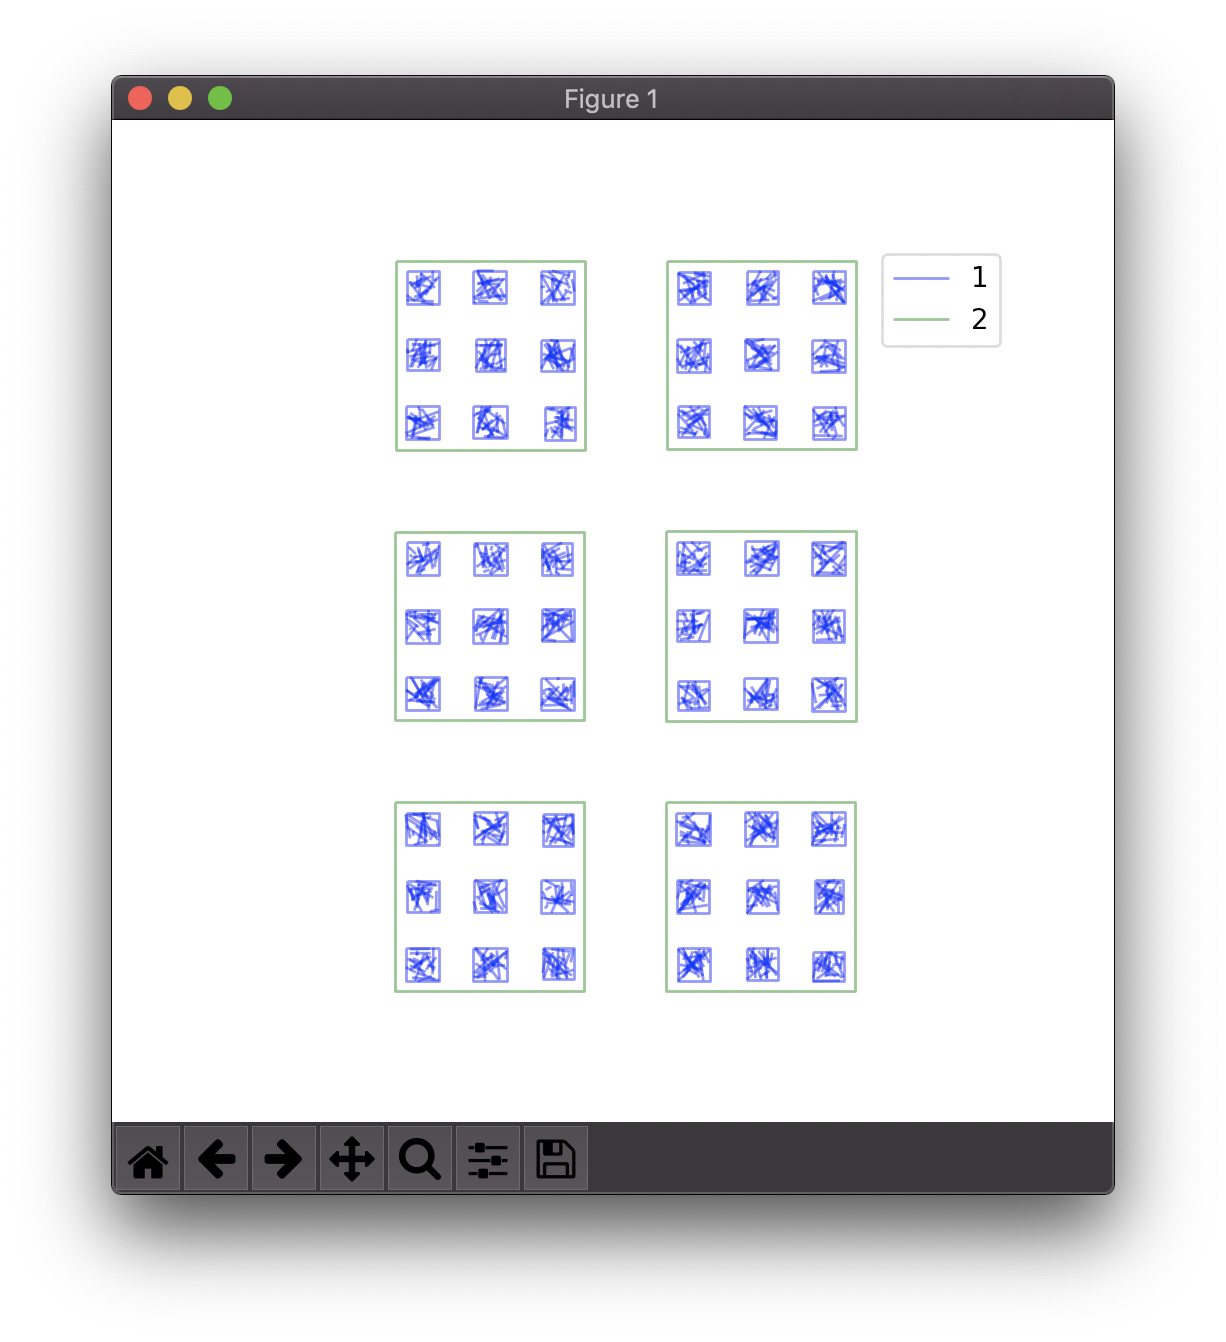
Let us consider an example:
                                           command              command
                                    ┌─────────┴────────┐┌──────────┴──────────┐

$ vpype  begin  grid -o 2cm 2cm 2 2  circle 1cm 1cm 8mm  line 1cm 2mm 1cm 18mm  end  show

        └──┬──┘└─────────┬─────────┘└────────────────────┬────────────────────┘└─┬─┘
         block         block                           nested                  block
         start       processor                        pipeline                  end
Here, the block starts with the begin command and the grid block processor, and ends with the end command. The nested pipeline is made of the circle and line commands. (As of vpype 1.9, the begin command is optional since the use of a block processor command implies the beginning of a block. It is included here for clarity, but most examples in this documentation omit it.)
Here is how the pipeline above could be schematize and the output it produces:


How does the grid command use the nested pipeline? How many times is it executed? The diagram on the right illustrates the answer. It executes the nested pipeline once for each “cell”. In the example above, there are 4 cells because it is passed the arguments 2 and 2 for the number of columns and rows. The nested pipeline is thus executed 4 times. Each time, the nested pipeline is initialised empty of any geometries. Then, after it is executed, the resulting geometries are translated by an offset corresponding to the cell being rendered. Finally, the translated geometries are merged into the outer pipeline.
Block processor commands#
This section provides an overview of the available block processors. In particular, the variables created by block processors are listed. Using these variables, prefixed with the underscore character _, is needed by most real-world application of block processors.
Note that, as usual, a complete documentation on each block processors is available using the --help command-line option:
$ vpype grid --help
Usage: vpype grid [OPTIONS] NX NY

  Creates a NX by NY grid of geometry

  The number of column and row must always be specified. By default, 10mm
  offsets are used in both directions. Use the `--offset` option to override
  these values.

  [...]
grid#
As amply illustrated in the previous sections, the grid block processor is used to create grid layout. It defines the following variables:
_nx: the total number of columns (NX)_ny: the total number of rows (NY)_n: the total number of cells (NX*NY)_x: the current column (0 to NX-1)_y: the current row (0 to NY-1)_i: the current cell (0 to _n-1)
The Laying out multiple SVGs on a grid recipe provides a real-world example with the grid command.
repeat#
The repeat block processor executes the nested pipeline N times, where N is passed as argument. The nested pipeline is initialised without any geometries and, like the grid command, its output is merged to the outer pipeline.
The following example creates four layers, each populated with random lines:
$ vpype repeat 4 random -l new -a 10cm 10cm -n 30 \
    end pens cmyk show
The repeat command defines the following variables:
_n: number of repetitions (N)_i: counter (0 to N-1)
forlayer#
The forlayer block processor executes the nested pipeline once per pre-existing layer. The nested pipeline is initialised with empty geometry except for the layer being processed. After the pipeline is executed, the corresponding layer is replaced in the outer pipeline and the other ones, if any, merged.
It defines the following variables:
_lid(int): the current layer ID_name(str): the name of the current layer_color(vpype.Color): the color of the current layer_pen_width(float): the pen width of the current layer_prop: the properties of the current layer (accessible by item and/or attribute)_i(int): counter (0 to _n-1)_n(int): number of layers
Note
The _prop object set by forlayer should not be mistaken with the lprop built-in object (see Built-in symbols). _prop provides access to the properties of the layer currently iterated on by forlayer. In contrast, lprop provides access to the properties of the layer targeted by the current (nested) command. Both layers do not need to be, and often are not, the same.
The Saving each layer as a separate file and Load multiple files, merging their layers by name recipes provide real-world examples of the forlayer command.
forfile#
The forfile block processor specializes with processing multiple input files. It takes a file path pattern as input (e.g. *.svg), expends it as a list of files, and executes the nested pipeline once per file in the list. The nested pipeline is initialized with empty geometries and, after it is executed, its content is merged into the outer pipeline.
It defines the following variables:
_path(pathlib.Path): the file path (see Using paths)_name(str): the file name (e.g."input.svg")_parent(pathlib.Path): the parent directory (see Using paths)_ext(str): the file extension (e.g.".svg")_stem(str): the file name without extension (e.g."input")_n(int): the total number of files_i(int): counter (0 to _n-1)
The Merge multiple SVGs into a multilayer file and Load multiple files, merging their layers by name recipes provide real-world examples with the forfile command.
Nested blocks#
Blocks can be nested to achieve more complex compositions. Here is an example:
$ vpype \
    grid --offset 8cm 8cm 2 3 \
      grid --offset 2cm 2cm 3 3 \
        random --count 20 --area 1cm 1cm \
        frame \
      end \
      frame --offset 0.3cm \
    end \
    layout a4 \
    show
Command files#
Pipelines be quite complex, especially when using blocks, which can become cumbersome to include in the command-line. To address this, all or parts of a pipeline of commands can be stored in so-called “command files” which vpype can then refer to. A command file is a text file whose content is interpreted as if it was command-line arguments. Newlines and indentation are ignored and useful only for readability. Everything to the right of a # character is considered
a comment and is ignored.
The nested block example from the previous section could be converted to a command file with the following content:
# command_file.vpy - example command file
begin
  grid --offset 8cm 8cm 2 3
    begin
      grid --offset 2cm 2cm 3 3
      random --count 20 --area 1cm 1cm
      frame
    end
  frame --offset 0.3cm
end
show
The command file can then be loaded as an argument using the -I or --include option:
$ vpype -I command_file.vpy
Regular arguments and command files can be mixed in any combination:
$ vpype -I generate_lines.vpy write -p a4 -c output.svg
Finally, command files can also reference other command files:
# Example command file
begin
  grid --offset 1cm 1cm 2 2
  -I sub_command.vpy
end
show